Technical

WordPress Website Overhaul Part 3 by Harold Brown

Welcome to part 3 of my WordPress Website Overhaul. In my last post I listed the plugins that I use for security, spammers and sploggers. These are important plugins and should be used on your site.  Although I am posting about my WordPress overhaul this is really an ongoing process that I do from time-to-time. After 2 years of my site being on WordPress it was time to review everything and make some changes. I will watch the stats on my plugins and make some changes as necessary, maybe I will be able to delete another plugin!

Bhaga Video | Harold Brown

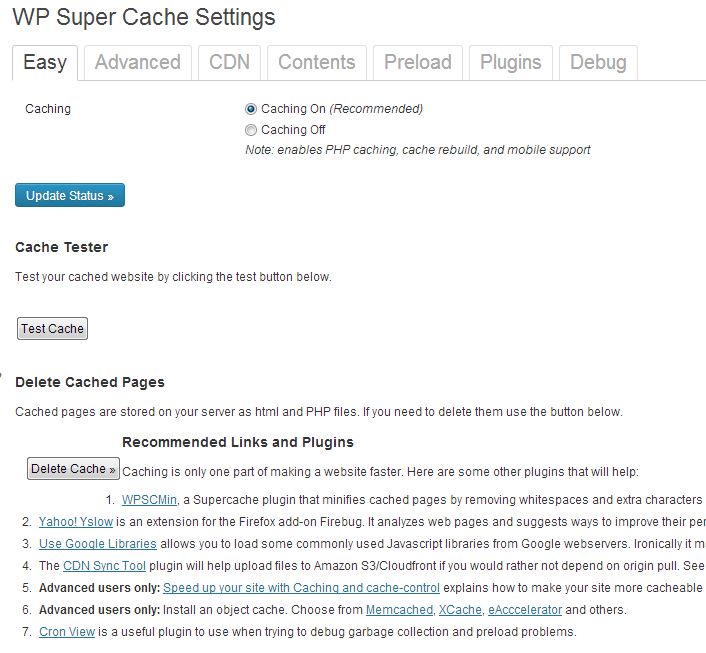
The next set of plugins that are import are the cache enabling ones. Pre-loading your pages to memory makes them much faster to load and can increase your rankings in search engines. More than that, your visitors won't be discouraged by slow load times and are more likely to take a look at your site.  It isn't unusual that I will close out a tab in my browser if a site takes too long to load. I like WP Super Cache and it seems to play well with my other plugins. There are plenty of basic and advanced settings that when used can really speed up your site. I also use WP Widget Cache and Use Google Libraries. You may get both increased speed from Google Libraries as well as the latest javascripts hosted on Google helping to keeping your site up-to-date and conflict free.

[dropshadowbox align="none" effect="lifted-both" width="autopx" height="" background_color="#f1ca37" border_width="1" border_color="#dddddd" ]Some say plugins don't add to your sites load times....yes they can![/dropshadowbox]

Now that we have discussed the necessary plugins lets look at a plugin that I feel is second only

WordPress Website Overhaul Part 3

to the security ones. It is a plugin called P3 (Plugin Performance Profiler), and it is my favorite plugin. This plugin actually scans your site and plugins and provides a performance profile of your site's load time, and displays which plugins are impacting your sites load times the most. This is where you can make important decisions on which plugins to keep and remove/swap out. Not all code is created equal and not everyone can write efficient code. This plugin will help you understand what plugins take the longest to load and aid you in comparing similar plugins to one another. Make sure you take a look at this one, perhaps after seeing its analysis you will stop blaming your host for your sites poor performance.

Bhaga Video | Harold Brown

A nice complement to P3 is Pingdom. Pingdom provides uptime monitoring and performance monitoring. I periodically visit Pingdom and check on my sites performance and compare it to the history of tests that I have done. Well worth the time it takes.

When adding plugins to your site do your homework and research what is available and when checking the plugins out don't forget to check their performance with P3 and Pingdom.

WordPress Website Overhaul Part 3

I hope you have gotten something out of my three part series about WordPress site building/plugin selection. Keep doing your research and revisit your site from time to time to see what improvements you can make.

WordPress Website Overhaul Part 1 by Harold Brown

Bhaga Video Productions

I have completed my WordPress Website Overhaul and it was well worth the time that it took. This post is more about approach, but part 2 will contain more information on the plugins that I use. BhagaVideo.com is a self hosted WordPress site that makes use of many plugins. When I started the overhaul, my site load times were running in the 5 seconds area and I really wasn't happy with the overall look and feel of the site. I mostly do video and photography for fun and blog about my travels both near and far. Through this website I encourage others to digitize and restore their old photos and document their travels.

Photos.BhagaVideo.com

My photo website is Photos.BhagaVideo.com and it contains 6,000 pictures that I have taken since I was 10 years old. Most of the pictures are available for public viewing and many others are in private albums. The two sites contain links between them, with most of the pictures in my blog originate from the photo site. My photo site is hosted by SmugMug.

Before using WordPress I was writing my own code, but decided that I wanted my site to be more of a blog and WP seemed like a good way to go. I have used many themes trying each one out but was never really satisfied. One of my requirements for my photo site was GEO Mapping of my pictures, yet my blog did not make use of that. That didn't make sense. So I started looking at themes and came across Travel Blogger. Its theme was travel and it had Google Maps functionality built in. A perfect compliment to my photo site. I installed the Theme and made the adjustments to the size of the columns using a slider provided by the Theme.  If your blog is about cruising they have a Theme entitled "Seaward Bound" there is also a NYC Theme. Check them out.

Once I installed the theme I had the option of adding maps to all of my posts. I went back through my older posts and updated them to include a Google Map where that made sense to do. That is as simple as adding the shortcode to the end of my post. I only had about 50 posts that I needed to review so for me this wasn't a daunting task.

The second task was to review all of the Pages for content. I needed to update them to emphasize the travel focus of my site as well as still providing the inspiration around capturing old photos and converting 8mm film to video. This isn't exciting work but I believe that your site should have some consistency to it and stick to the theme.

The third task was to look at all of the plugins that I had installed and decide which ones I really didn't need, want or were overlapped by another plugin. You can get pretty hung up on cool thinks that really doesn't matter to anyone, and just adds to the load time of your site.

BhagaVideo.com

If you are going to run stats on your site pick the one that you like and go with it. I had Google Analytics, "Visitor Maps and Who's Online", and Woopra. I like Woopra but it really didn't give me anything more than what I can get with Google and the live chat isn't something that I will be doing. The most visitors I have ever had at one time is 26 and almost no one leaves a comment so what is the point? Worth considering if you are spending a lot more time on your site. "Visitor Maps and Who's Online" is something I like as well and the map of the world is great, but at the end of the day it is something I like and nothing my visitors really care about. The Who's online is good but again Google Analytics has it covered. It is a great option for anyone who wants to disconnect themselves from Google. I run Google Analytics on my photo website so I decided to go with Google Analytics and deleted the other 2 plugins. My first victory!

The next to go was copyrightpro. It works very well, but nothing on my site is worth protecting so again I had to ask myself, what's the point? It is just adding to the load time of my site, so deactivated and deleted. Next was Google Fonts, I wasn't using the plugin and I don't see a need to ever use it. I want to keep my site cleaner looking without a lot of colors and differing fonts.

I suggest that you follow the same idea that I did and delete the plugins that you no longer use or care about. The search engines are looking at your sites load time to improve its ranking so it is best to make site speed your priority rather than plugins that don't bring value to your visitors or you. The net result of doing the above dropped a full 1.5 seconds off the load time of my site. Well worth the effort that I made.

Look for part 2 of my overhaul post. I will get more into the plugins I decided on keeping and how I decided what to get rid of or replace.

Please feel free to comment below. Registration not required!

Lunch at Gervasi Vineyard and the Sony DSC-H70 by Harold Brown

In the summer when the weather is nice my wife and I like to go to a restaurant and sit outside for lunch or dinner and enjoy our meal. Unfortunately that typically means looking out over a parking lot as cars drive by. Not so at our local winery, Gervasi Vineyard. For the past 2 years we have been able to relax near the lake, enjoy our meal and never once see a car drive by.  It also gives me an opportunity to take a few pictures and post them to my photo site, and send some to Facebook from my iPhone (hey, this site is about photography). I recently bought my wife a Sony DSC-H70 camera and decided to give it a try after lunch. It replaced her Kodak Z1485IS and I wanted to see what it could do. Right off the bat I noticed that the colors of the Sony seemed to be a little more true to life and the amount of color noise in the pictures was significantly less. Of course low light pictures and small cameras just don't get along so don't expect miracles. I also liked that the LCD was bright and easier to see than the LCD on the Kodak. I am not going to bother with all of the camera specs, you can find that elsewhere on the net.

So, let's take a look at a few pictures from the Sony DSC-H70 all shot in the 16:9 aspect ratio.

Lunch at Gervasi Vineyard and the Sony DSC-H70

The picture above was taken at ISO 80, focal length 4.25mm, f/8 at 1/200 second. Notice the distortion on the 2 structures at the bottom of the picture. Both structures are leaning toward the center of the picture.


Lunch at Gervasi Vineyard and the Sony DSC-H70

The picture above was taken at ISO 80, focal length 4.25mm, f/8 at 1/125 second.

 The camera also has built in skin smoothing which I was curious to try. I have to say that it can do a very good job with excellent results on both light and dark skin. However, like most technologies randomly applied, it can also give some very plastic looking results. Our friend took this picture of my wife and I, it is a little soft on focus, but skin smoothing has been applied to both of us by the camera. Judge for yourself if you like it.

Lunch at Gervasi Vineyard and the Sony DSC-H70

The picture above was taken at ISO 80, focal length 10.09mm, f/4.5 at 1/60 second with flash. I adjusted the contrast of the picture, because it was a little washed out from the flash.

The camera also has a panorama feature that I tried out. You push the shutter button once, and then you move the camera from left to right and the H70 does the rest. To use it properly you have to get the timing down a bit, as to how fast you move the camera from left to right. My first couple of pics ended before the far most right pictures were captured. For those pictures I just cropped out the blank area on the right and made a smaller panorama.

Lunch at Gervasi Vineyard and the Sony DSC-H70

Here is an example of a full panorama picture the Sony DSC-H70 can capture.

The picture above was taken at ISO 250, focal length 4.25mm, f/8 at 1/160 second.

Overall I like the camera, but I always end up comparing everything to my Nikon D90, and so I am always hoping for more in a small camera. Lets hope all manufactures stop with the megapixels and concentrate on better lenses!

[mapsmarker marker="12"]

SmugMug for Photographs and Video by Harold Brown

I started out having photos on my website using a flash album. Unfortunately I quickly discovered that a flash album wasn't really what I wanted. It was OK to display a few pictures, but I have thousands of pictures that I share with family from four continents. To accomplish what I wanted would take months to develop, and I wouldn't come close to all the features that several websites already deliver. Once I realized that I needed to look elsewhere, I jotted down a few requirements. I was looking for a photo hosting site that gave me:

  • Presentation Options
  • GPS Support
  • Clean Look
  • No Advertising
  • Video Support
  • Affordable Packages

I looked at several of the popular photo websites options, and after a few days of reading and visiting the various sites I decided on SmugMug. I did a trial run on SmugMug before I signed up for the Power account. I liked what I saw and have been uploading pictures ever since. Take note that you need to think through how you want to build your galleries. In mid July 2010 I ended up doing a complete re-org of my site including reloading most of my pictures. I did this after purchasing Lightroom 3, but that is another post for another day.

For me, my photo website is about my life and experiences in pictures and video. Since all of our lives are touch by many others, the site cannot help but also include the lives of my family and friends. A feature I like, that SmugMug provides, is the ability to "Collect" a photo. For example, I have a gallery on my 2009 safari in Kruger Park, South Africa. That gallery contains pictures of animals, but also pictures of family, friends, buildings, rivers, etc. Through "Collect" I am able to create a subset of the Kruger gallery containing just the pictures of the animals. Strangers can enjoy the pictures of the wildlife without looking at my pictures of the evening cookouts. That is a great feature and I use it a lot.

Since SmugMug provided the essentials that I needed to create and organize my photo website, the rest was up to me to decide how to organize my photographs. I knew I needed the flexibility to organize my site, but I didn't know exactly how to do that. I have thousands of photographs of all sorts of things. How do you break that down into a few categories? It took me almost a year to really evolve to the structure I have today. Since I am a big nature lover I knew that I needed a master category for Nature. I do a lot of traveling so I created a vacation category which I later regretted and changed the name to Travel (I did this in my big re-org).  I also love cars so I created a category just for cars. The Movie category I added is dedicated to the videos that I have created over the years. This structure process shouldn't be overlooked or down played. It is very important how you organize your photographs, otherwise no one will be able to find the pictures they are looking for, including yourself. The big thing is to know who you intend your audience to be, and what you want to accomplish. I have two messages. Get out and see the world and capture your interests and loves so they can be remembered and shared for years to come. Your photo site may be to sell pictures and therefore organized completely different than mine.

_____________________________________________

Regardless of your intent, SmugMug can provide the tools you need as an amateur photographer, or a professional displaying or selling their work.

Save $5 on a SmugMug subscription by using my personal coupon code (PKCMh9ndQs5rA) in the Coupon field at the end of your trial. Or, you can use this link to try out SmugMug: https://secure.smugmug.com/signup.mg?Coupon=PKCMh9ndQs5rA

Mercalli V2 Pro by Harold Brown

Mercalli V2 - More than just a stabilizer

Mercalli V2 Pro
Mercalli V2 Pro

Important facts about Mercalli and V2 Improvements:

  • 3D stabilization of all 3 camera axis
  • Fully automatic rolling-shutter correction of jello/skew/wobble effects
  • Available Mercalli SAL stand alone application offers features not possible in a plug-in solution
  • Lower need for zoom-in than other post-capture stabilization products
  • Dynamic camera mode retains the flavor of the video during stabilization
  • Automatic scene change detection allows one stabilization pass for several scenes
  • Eliminates jitter in video, even in zoom/pan moves
  • Smoother results for all video records, from Handycam until Steadycam
  • Unlimited Multi-core CPU support for super-fast renderings
  • Full resolution preview for fast and efficient fine-tuning
  • No need for keyframes or time-consuming tracking points
  • Superior ease of use: Load video – stabilize – go!
  • Full 32-/64-Bit Support for the Standalone application as well plug-ins for popular editing solutions

I have been using the Mercalli plugin from proDad since it was introduced, and I have had great success with it. The fact that I could use it as a plugin with my NLE made it very convenient to use, and it worked great. I have used both Mercalli and Virtual Dub, but I have always felt that Mercalli gave me a slightly better final result. Of course that may be subjective on my part, but there are a few others that agree. This past year I decided to go total 64bit and not bother installing the 32bit NLE. As a result I needed to update to Mercalli V2 Pro which comes in 32bit and 64bit versions. proDad has done a great job provide several versions of the Pro stabilizer for the cost of the upgrade (32bit, 64bit and a Stand Alone Version).

John RoFrano has done an excellent job reviewing Mercalli V2 Pro. No sense rehashing what John has so thoroughly already done.

Warning: You may need to alter your work flow if you find yourself needing to stabilize a clip. For example if you split the clip in to two clips each segment will need to have the Mercalli plugin applied. That could result in a different border/zoom for each clip. The seamless flow between the split clip could cause what appears to be a jump cut, because the two clips most assuredly will have a different zoom (caused by the settings and unsteadiness for that unique clip).

In John's video he shows you the zoom change between Mercalli 1 and 2. In my clip I decided to use the borders option which does not zoom. This example allows you to see how much more of the picture Mercalli 2 displays than older V1 when applying an almost exact same amount of stabilization.

In the above video clip Mercalli Expert is applied to the left half of the video and Mercalli V2 Pro is applied to the right half. I used the border option so no zoom would be applied. As you can see the stabilization is very close to matching for each half, but notice how much more of the image can be seen on the right side using V2. Well worth the investment! I was able to upgrade for $111.20. After the purchase it took about 6 hours to get the license key and links to download the Mercalli software.

In the video below Hyderabad traffic was captured on a Sony HDR-XR520. I then applied Mercalli V2, color correction, unsharp mask and a small amount of saturation.

Traffic Stabilized by Mercalli V2 Pro

Roll Compensation: 50%, Horizontal Tilt Compensation: 50%, Vertical Tilt Compensation: 50%, Glide Camera w/Rolling-Shutter Compensation, Pan Smoothing: 40%, Avoid Border set at 30% zoom.

Traffic Stabilized Original Vs Stabilized

Here is a split screen comparison of the stabilization.

Traffic Stabilized on raw footage Vs Stabilized (Mercalli V2 Pro).

To see stabilized video from my Nikon D90 using Mercalli V2 Pro Stand Alone follow this link.